Category: IDIRA

Practical guides, installation procedures, upgrades, troubleshooting and lessons learned from IDIRA (Former CyberArk) environments.

  • Building an IDIRA (formerly CyberArk) CPM Plugin for a REST API: What I Learned from a Real-World Integration

    Recently, I had the opportunity to build an IDIRA (formerly CyberArk) Central Policy Manager (CPM) plugin for an application that exposes a REST API.

    The requirement sounded simple:

    Allow the CPM to verify an account password and automatically change it through the application’s REST API.

    But, as usually happens with integrations, the interesting part starts when you move from:

    “I can change the password with Postman, Bruno, or PowerShell.”

    to:

    “Now I need the CPM to understand this entire workflow.”

    While researching how to approach this, I found an excellent article by Tim Schindler about creating a CPM plugin using the REST API Framework. His article helped me understand the structure of the framework and gave me the starting point I needed to build my own implementation.

    So, first of all, credit to Tim for sharing his work with the community.

    His original article can be found here:

    https://timschindler.blog/creating-a-cyberark-central-policy-manager-plugin-for-an-api-using-the-new-rest-api-framework

    In this article, I want to take a slightly different approach.

    Instead of simply explaining the framework, I will walk through a real-world plugin I developed, with customer-specific information removed or generalized, and focus on the reasoning behind the implementation.

    The goal is not to give you something to copy and paste.

    The goal is to understand how to think about a REST API CPM plugin.


    The Scenario

    Imagine an enterprise application that manages its own user accounts and exposes REST API endpoints to:

    • authenticate a user;
    • create an authenticated session;
    • search for a user;
    • retrieve the user’s internal ID;
    • change the user’s password;
    • close the authenticated session.

    The customer wants IDIRA PAM to manage these accounts automatically.

    There is one important detail: the application allows a privileged administrative account to change another user’s password.

    This gives us two types of credentials:

    Target account — The account whose password is stored and managed by IDIRA.

    Logon account — A privileged account that can authenticate to the API and modify the target account.

    And that gives us two CPM workflows:

    VERIFY
    Target Account
    |
    v
    Authenticate
    |
    +---- Success ---> Password is valid
    |
    +---- Failure ---> Verification fails

    For Change:

    CHANGE
    Logon Account
    |
    v
    Authenticate
    |
    v
    SessionId
    |
    v
    Find Target User
    |
    v
    UserId
    |
    v
    Change Password
    |
    v
    Logout

    Once I understood and drew these workflows, designing the XML became much easier.

    Don’t start by writing XML. Start by understanding the API workflow.


    Thinking About the REST API Framework

    If you have worked with traditional CPM plugins, especially TPC plugins, you may be used to thinking about:

    Process.ini
    Prompts.ini
    PowerShell
    State Machine

    The REST API Framework changes that mental model.

    Instead of controlling an interactive process, we describe a sequence of API operations:

    Parameters
    API Calls
    Responses
    Parsed Values
    Next API Call
    Chains

    The XML becomes a description of the conversation between CPM and the target API.

    A simplified plugin structure looks like this:

    <RestPlugin>
    <Parameters>
    ...
    </Parameters>
    <ErrorMessages>
    ...
    </ErrorMessages>
    <APICalls>
    ...
    </APICalls>
    <Chains>
    ...
    </Chains>
    </RestPlugin>

    Let’s go through the important parts.


    Step 1 — Creating Reusable Parameters

    The first thing I wanted to avoid was repeating URLs throughout the plugin.

    For example:

    <Parameters>
    <Parameter
    name="AddressWithValidation"
    validationPattern="{{AddressValidationPattern}}">
    {{Address}}
    </Parameter>
    <Parameter name="BaseURL">
    {{AddressWithValidation}}
    </Parameter>
    <Parameter name="AuthURL">
    {{BaseURL}}auth/session
    </Parameter>
    <Parameter name="LogoutURL">
    {{BaseURL}}auth/logout
    </Parameter>
    </Parameters>

    Instead of repeating:

    https://application.example.com/api/...

    everywhere, requests can reuse:

    {{BaseURL}}

    This makes the plugin easier to read and maintain.

    However, while implementing this, I discovered an important limitation.

    Be Careful with Runtime-Derived Parameters

    The top-level <Parameters> section should contain values that can already be resolved when the plugin is initialized.

    For example:

    <Parameter name="BaseURL">
    {{AddressWithValidation}}
    </Parameter>

    works because AddressWithValidation is already available.

    The problem appears when a parameter depends on information that will only be obtained from a previous API call.

    During my first implementation, I tried something conceptually similar to this:

    <Parameter name="ChangePasswordURL">
    {{BaseURL}}api/entity/User/{{UserId}}
    </Parameter>

    At first glance, this looks reasonable.

    But UserId does not exist yet.

    It will only become available after another API call:

    Authenticate
    Get User
    Parse UserId
    Change Password

    Because the top-level parameter depended on a runtime value that had not yet been populated, the plugin failed during initialization.

    The solution was simple: build the URL inside the API call that actually consumes the runtime value.

    <Request name="ChangePassword" method="PUT">
    <URL>
    {{BaseURL}}api/entity/User/{{UserId}}
    </URL>
    ...
    </Request>

    By the time ChangePassword executes, the previous API call has already populated UserId.

    The rule I now follow is:

    Do not define a top-level reusable parameter that depends on a value that does not exist yet.

    Think of the values in two groups:

    Available at initialization
    ---------------------------
    Address
    BaseURL
    AuthenticationURL
    LogoutURL
    Platform parameters
    Runtime-derived
    ---------------
    SessionId
    UserId
    AccountId
    Token
    ObjectId
    ResourceId

    Runtime-derived values normally come from previous API responses and should be consumed only after the call that creates them has completed.

    Keeping these dependencies close to the API call that uses them also makes the XML much easier to troubleshoot.


    Step 2 — Implementing Verify

    Verify is the simplest operation.

    We don’t need to modify anything. We only need to prove that the username and current password stored in IDIRA can successfully authenticate to the target system.

    Conceptually:

    <Request name="LogonAsTargetAccount" method="POST">
    <URL>{{AuthURL}}</URL>
    <Headers>
    <Header key="Content-Type">application/json</Header>
    </Headers>
    <Body>
    {
    "username": "{{targetaccount\username}}",
    "password": "{{targetaccount\password|JsonEscape}}"
    }
    </Body>
    </Request>

    The important part here is:

    targetaccount\username
    targetaccount\password

    We are explicitly telling the framework to use the credentials belonging to the account being managed.

    There is another important detail:

    |JsonEscape

    Passwords are unpredictable and may contain characters that have special meaning inside JSON.

    Using:

    {{targetaccount\password|JsonEscape}}

    instead of directly inserting the password helps ensure that the value is correctly escaped when placed inside the JSON payload.

    This is particularly important to me because I have previously encountered CPM plugin problems caused by special characters being passed incorrectly between components.

    Whenever credentials move between systems, encoding and escaping deserve attention.


    Step 3 — Parsing the API Response

    Sending the request is only half of the job.

    The CPM also needs to understand what comes back.

    Imagine authentication returns:

    {
    "sessionId": "ABC123456"
    }

    We need that session for the next API calls.

    The response can therefore parse it:

    <Response
    name="LogonAsTargetAccountSuccess"
    type="valid"
    format="json"
    statusCode="200">
    <Parse>
    <ParseBody>
    <Parameter
    name="SessionId"
    path="sessionId"/>
    </ParseBody>
    </Parse>
    </Response>

    Now:

    sessionId

    from the API response becomes:

    {{SessionId}}

    inside the plugin.

    This is an important concept in multi-step REST integrations:

    The output of one API call can become the input of the next one.

    We will use exactly the same principle later with the target user’s internal ID.


    Step 4 — Error Handling Is Part of the Design

    A production plugin needs to understand failure just as well as success.

    For example:

    400 → Invalid or malformed request
    401 → Authentication problem
    403 → Authenticated, but not authorized
    404 → Target object not found
    500 → Target API/server problem
    503 → Service unavailable

    These situations should not all become:

    Plugin failed

    For example:

    <Response
    name="AuthenticationFailed"
    type="error"
    statusCode="401">
    <ErrorMessage
    name="AuthenticationFailedMessage"
    returnCode="2001"
    description="Target account authentication failed."/>
    </Response>

    In my implementation, I separated authentication failures, authorization problems, account-not-found conditions, password-change failures, server errors, and service-unavailable conditions.

    That gives the engineer troubleshooting the CPM something useful:

    Target account authentication failed.

    instead of simply:

    Operation failed.

    Good error handling isn’t just a developer feature.

    It makes the plugin supportable in production.


    Step 5 — Building the Change Workflow

    Change is more interesting because the target API does not allow us to simply say:

    Change password for service-account

    The password-change endpoint requires the application’s internal user identifier.

    Something similar to:

    ABC-123-XYZ

    Therefore, Change becomes a multi-step operation:

    1. Authenticate using the privileged Logon Account.
    2. Receive a SessionId.
    3. Search for the Target Account.
    4. Extract its internal UserId.
    5. Change the password.
    6. Logout.

    Let’s translate that into API calls.


    Step 6 — Authenticating and Finding the Target User

    For Verify, we authenticated with:

    targetaccount\username
    targetaccount\password

    For Change, we authenticate with:

    logonaccount\username
    logonaccount\password

    For example:

    "username": "{{logonaccount\username}}",
    "password": "{{logonaccount\password|JsonEscape}}"

    The successful response gives us the SessionId.

    Now we can search for the target account:

    <Request name="GetUser" method="GET">
    <URL>
    {{BaseURL}}api/users?username={{targetaccount\username|urlEncode}}
    </URL>
    <Headers>
    <Header key="Content-Type">application/json</Header>
    <Header key="Cookie">
    session={{SessionId}}
    </Header>
    </Headers>
    </Request>

    Notice another modifier:

    |urlEncode

    The username becomes part of a URL, so it should be properly encoded instead of being blindly concatenated into the request.

    Imagine the API returns:

    [
    {
    "values": {
    "UserId": "ABC-123-XYZ",
    "Username": "service-account"
    }
    }
    ]

    We can extract the ID:

    <Parse>
    <ParseBody>
    <Parameter
    name="UserId"
    path="[0].values.UserId"/>
    </ParseBody>
    </Parse>

    At this point, the plugin has everything required for the password change:

    SessionId
    UserId
    NewPassword

    Step 7 — Changing the Password

    Now we can call the password-change endpoint:

    <Request name="ChangePassword" method="PUT">
    <URL>
    {{BaseURL}}api/users/{{UserId}}
    </URL>
    <Headers>
    <Header key="Content-Type">application/json</Header>
    <Header key="Cookie">
    session={{SessionId}}
    </Header>
    </Headers>
    <Body>
    {
    "values": {
    "Password": "{{newpassword|JsonEscape}}"
    }
    }
    </Body>
    </Request>

    There are three important pieces here:

    {{UserId}}
    {{SessionId}}
    {{newpassword|JsonEscape}}

    UserId came from the previous user-search request.

    SessionId came from authentication.

    newpassword is the new password generated for the account and is safely escaped for the JSON payload.

    This is the core of the Change operation.


    Step 8 — Don’t Forget the Logout

    If the target API creates a server-side session, I don’t want the CPM repeatedly authenticating and leaving unnecessary sessions behind.

    So the workflow also includes a logout operation:

    <Request name="Logoff" method="POST">
    <URL>{{LogoutURL}}</URL>
    <Headers>
    <Header key="Content-Type">application/json</Header>
    <Header key="Cookie">
    session={{SessionId}}
    </Header>
    </Headers>
    </Request>

    Session cleanup may look like a small detail, but it should be considered part of the integration design.


    Step 9 — Chains: Putting Everything Together

    We now have the individual API calls.

    The Chains section defines which calls belong to each CPM operation and the order in which they should execute.

    For Verify:

    <Chain name="verifypass">
    <Request name="LogonAsTargetAccount"/>
    <Request name="Logoff"/>
    </Chain>

    For Change:

    <Chain name="changepass">
    <Request name="LogonAsLogonAccount"/>
    <Request name="GetUser"/>
    <Request name="ChangePassword"/>
    <Request name="Logoff"/>
    </Chain>

    And this is where the entire implementation becomes easy to visualize:

                     IDIRA CPM
                         |
              +----------+----------+
              |                     |
           VERIFY                 CHANGE
              |                     |
              v                     v
     Target Credentials       Logon Credentials
              |                     |
              v                     v
         Authenticate           Authenticate
              |                     |
              v                     v
          SessionId              SessionId
              |                     |
              |                     v
              |                 Find User
              |                     |
              |                     v
              |                   UserId
              |                     |
              |                     v
              |               Change Password
              |                     |
              +----------+----------+
                         |
                         v
                       Logout
                         |
                         v
                     CPM Result

    The XML is essentially the implementation of this workflow.


    Practical Lessons I Learned

    Beyond the XML itself, this project taught me a few things that I will reuse in future CPM integrations.

    1. Design the API workflow before writing the plugin

    Before touching the XML, I want to answer:

    • How does authentication work?
    • Which account performs each operation?
    • Does authentication return a token or session?
    • How do I identify the target account?
    • What does the password-change endpoint require?
    • Which values must move between API calls?
    • How is the session terminated?
    • Which failures should CPM understand?

    If I cannot clearly draw the workflow, I’m probably not ready to build the plugin.

    2. Test the API before testing the CPM plugin

    This is probably my favorite troubleshooting rule from this project:

    Don’t troubleshoot the API and the CPM plugin at the same time.

    Before building the XML, validate the individual operations with a tool such as:

    Bruno
    Postman
    PowerShell
    curl

    Make sure authentication works.

    Make sure you can find the user.

    Make sure the password-change request works.

    Make sure logout works.

    Otherwise, you may end up troubleshooting:

    CPM + XML + Authentication + API + JSON + Permissions

    all at once.

    If the API calls have already been independently validated, the troubleshooting scope becomes much smaller.

    3. Pay attention to when values become available

    This was one of the most useful lessons from the implementation.

    A value such as:

    BaseURL

    can exist before the chain starts.

    A value such as:

    UserId

    may only exist after a specific API response has been parsed.

    Understanding that difference prevents initialization problems and makes the relationship between API calls much clearer.

    4. Treat error handling as part of the plugin architecture

    Don’t design only for HTTP 200.

    Think about what the engineer supporting the platform needs to know when something goes wrong.

    A good plugin should help distinguish between:

    Wrong credentials
    Unauthorized operation
    Target account not found
    Password rejected
    Target API failure
    Service unavailable

    That information can save a lot of troubleshooting time later.


    Something I Would Improve Further

    One area I would continue improving is API error reporting.

    Several API responses provide information similar to:

    ErrorCode
    ErrorMessage

    which can be parsed:

    <Parse>
    <ParseBody>
    <Parameter
    name="ErrorCode"
    path="ErrorCode"/>
    <Parameter
    name="ErrorMessage"
    path="ErrorMessage"/>
    </ParseBody>
    </Parse>

    A future improvement could be to expose carefully selected information from those API responses in CPM errors where appropriate.

    However, I would do this carefully.

    API responses may contain internal or sensitive information that should not automatically appear in operational logs.

    The goal should be:

    Useful troubleshooting information
    +
    No credentials or secrets
    +
    No unnecessary sensitive API details

    Logging should help troubleshoot the plugin without creating another security problem.


    What About Reconcile?

    You may have noticed that this implementation focuses on:

    verifypass
    changepass

    The plugin used for this article does not implement a reconcilepass chain.

    A complete CPM platform may also require reconciliation depending on the use case, but I don’t want to present something as implemented when it wasn’t part of this project.

    That leads to another rule I try to follow:

    Document what you actually built and tested, and clearly separate that from possible future designs.


    REST API Framework vs. TPC + PowerShell

    I’ve also worked with CPM integrations where a TPC plugin launches PowerShell and the script handles the REST API communication.

    That architecture may look like:

    CPM
    |
    v
    TPC
    |
    +--> Process.ini
    |
    +--> Prompts.ini
    |
    +--> PowerShell
    |
    v
    REST API

    With the REST API Framework, the architecture can be more direct:

    CPM
    |
    v
    REST API Plugin Framework
    |
    v
    Target REST API

    That does not mean PowerShell-based plugins are wrong.

    Sometimes the integration requires complex logic or transformations that justify additional scripting.

    But if the requirement is fundamentally:

    HTTP Request
    Parse Response
    HTTP Request
    Parse Response

    a framework designed specifically for REST APIs can provide a cleaner implementation.


    Final Thoughts

    Building this plugin changed the way I think about API-based CPM integrations.

    At first, the XML can look intimidating:

    Requests
    Responses
    Parameters
    Parsing
    ErrorMessages
    Chains

    But the XML is not really the starting point.

    The workflow is.

    My approach now is:

    1. Understand the target API.
    2. Test every API operation independently.
    3. Draw the authentication and password-management workflow.
    4. Identify which values are available at initialization and which are created at runtime.
    5. Translate each HTTP operation into an API call.
    6. Parse only the values required by later requests.
    7. Handle expected API failures explicitly.
    8. Connect the requests using CPM chains.
    9. Test Verify and Change independently.
    10. Only then move toward production hardening.

    If I had to summarize the biggest lesson from this project in one sentence, it would be:

    A good REST API CPM plugin starts as a good API workflow, not as a good XML file.

    Once the workflow is clear, the XML becomes a way of describing it.


    Credits and References

    A big thank you to Tim Schindler, whose article gave me the initial direction for working with the REST API Framework.

    https://timschindler.blog/creating-a-cyberark-central-policy-manager-plugin-for-an-api-using-the-new-rest-api-framework

    His article walks through building a CPM plugin using the REST API Framework and was an important reference while I was learning how to structure my own implementation.

    The example presented in this article is based on a real-world integration I developed, but customer-specific names, endpoints, identifiers, and other implementation details have intentionally been removed or generalized.

    IDIRA was formerly known as CyberArk. Some product names, components, documentation, binaries, and configuration parameters may still use the CyberArk name.
  • Troubleshooting an IDIRA/CyberArk CPM TPC Plugin: When the Problem Wasn’t the PowerShell Script

    Recently, I ran into an interesting issue with a custom IDIRA/CyberArk CPM TPC plugin that I use to manage passwords in One Identity.

    The plugin had been working before, but suddenly password changes started failing.

    At first, everything pointed toward the PowerShell script. After all, the TPC plugin launches PowerShell, the script makes the API calls to One Identity, and the failure appeared during that process.

    But as is often the case with CPM troubleshooting, the first error was only part of the story.

    In this post, I want to walk through what happened, the two separate problems I found, and why understanding the PluginManagerUser is important when troubleshooting custom CPM plugins.


    How the Plugin Works

    The plugin is a TPC-based CPM plugin.

    At a high level, the workflow looks like this:

    CPM
    |
    +-- Process.ini
    |
    +-- Prompts.ini
    |
    +-- PowerShell script
    |
    +-- Connect to One Identity
    +-- Build the API request
    +-- Change the password
    +-- Return the result to the TPC plugin

    The Process.ini controls the execution flow, while Prompts.ini identifies the responses returned during the process.

    The PowerShell script performs the actual interaction with the One Identity API.

    When everything works, the process is straightforward:

    CPM
    |
    v
    TPC Plugin
    |
    v
    PowerShell
    |
    v
    One Identity API
    |
    v
    Password changed

    Then one day, it stopped working.


    Problem 1: At line:1 char:143

    The first error I saw in the TPC trace was:

    At line:1 char:143

    The plugin attempted to find a known prompt in Prompts.ini, but none of the expected responses matched.

    Eventually, the generic standard prompt matched:

    .*

    At first, this made the problem look like an error inside the PowerShell script.

    I tried adding things such as:

    Write-Host
    Write-Output

    and even:

    Start-Transcript

    But nothing useful appeared in the logs.

    That turned out to be an important clue.

    The problem was happening before the PowerShell script was actually able to execute.


    The Password Was Breaking the PowerShell Command

    After looking more closely at the command generated by the TPC plugin, I found the first problem.

    One of the passwords contained a special character:

    *

    The password was being inserted directly into the command used to launch PowerShell.

    Conceptually, the TPC plugin was doing something similar to:

    PowerShell.exe & ".\bin\MyPlugin.ps1" -uri <address> -serviceAccPass <password> -UpdateUserPass <newpassword>

    Because the password became part of the PowerShell command line, the special character affected how PowerShell parsed the command.

    The location reported by:

    At line:1 char:143

    was exactly where the problematic character appeared in the generated command.

    This also explained why my Write-Host, Write-Output, and Start-Transcript debugging attempts didn’t help.

    The execution was effectively:

    TPC
    |
    v
    Start PowerShell.exe
    |
    v
    PowerShell parses command line
    |
    X Parsing error
    |
    +--> At line:1 char:143

    The script itself never got far enough to execute my debugging commands.

    After correcting the password/argument handling problem, PowerShell could launch the script again.

    But then I was back to the original problem.


    Problem 2: A Strange File Called 1

    Once the PowerShell parsing problem was solved, the plugin still wasn’t successfully managing the password.

    This time I noticed something very unusual.

    Every time the plugin failed, a file called simply:

    1

    with no extension was created under the CPM installation directory:

    [Drive]:\Program Files (x86)\CyberArk\PasswordManager

    That immediately changed the direction of my troubleshooting.

    Why was the plugin creating a file in the root of the Password Manager installation instead of writing where it was supposed to?

    This started looking less like an API problem and more like an execution-context or filesystem-permissions problem.

    And then I performed a test that provided the most useful clue in the entire investigation.


    The Test That Pointed Me Toward Permissions

    As part of the troubleshooting, I temporarily added the following parameter to the CyberArk platform:

    RunPluginWithHighPrivilege=Yes

    Then I ran the password change again.

    This time, the plugin worked successfully.

    That was a major clue.

    The PowerShell script was the same.

    The One Identity API was the same.

    The account being managed was the same.

    The TPC logic was essentially the same.

    But changing the privilege context under which the plugin executed changed the result from:

    FAILURE

    to:

    SUCCESS

    That immediately made me think:

    If the plugin works with higher privileges but fails under its normal execution context, maybe the problem isn’t the plugin logic at all. Maybe the normal plugin user doesn’t have permission to access something it needs.

    That shifted my investigation toward the Windows security context used to execute CPM plugins.

    And that eventually led me to the PluginManagerUser.


    Understanding the PluginManagerUser

    The PluginManagerUser was introduced starting with CPM version 12.2.4.

    It is a local Windows user involved in the CPM plugin execution architecture and is used by the CyberArk Password Manager service when executing plugins.

    This separation is important from a security perspective.

    We generally don’t want every plugin to execute with unnecessarily high privileges. The principle of least privilege applies here as well: a plugin should have only the permissions it requires to operate, rather than being granted elevated access to the server.

    This also means that there can be an important difference between:

    "I can run the PowerShell script successfully."

    and:

    "The CPM can run the PowerShell script successfully."

    Those are not necessarily equivalent tests.

    For example, I might log onto the CPM server and manually execute:

    .\rb_OneIdentity-Change.ps1

    under my administrative account.

    The execution context is then something like:

    Administrator
    |
    v
    PowerShell
    |
    v
    Script

    But during normal CPM operation, the plugin is executed under the security controls and permissions associated with the CPM plugin infrastructure:

    CPM
    |
    v
    Plugin execution
    |
    v
    PluginManagerUser context/permissions
    |
    v
    PowerShell
    |
    v
    Script

    So a script working manually doesn’t necessarily prove that the CPM execution context has everything it needs.


    Why RunPluginWithHighPrivilege=Yes Was Such an Important Test

    This was probably the most useful diagnostic step in my troubleshooting.

    The fact that:

    RunPluginWithHighPrivilege=No

    resulted in failure, while temporarily using:

    RunPluginWithHighPrivilege=Yes

    allowed the plugin to work, strongly pointed toward an execution-context or permissions difference.

    It gave me a much narrower troubleshooting question:

    What can the elevated execution context access that the normal PluginManagerUser context cannot?

    Instead of continuing to modify the API calls or PowerShell logic, I started looking at:

    • filesystem permissions;
    • CPM folders;
    • hardening;
    • permissions assigned to PluginManagerUser;
    • and directories the plugin might need during execution.

    This is also why I would treat RunPluginWithHighPrivilege=Yes primarily as a troubleshooting clue in this scenario, rather than simply leaving it enabled as the fix.

    If elevating the plugin resolves the problem, I want to understand why before deciding that elevation is necessary.


    Finding the Actual Permissions Problem

    Once I started looking at the problem from that perspective, things began to make sense.

    I checked the permissions on the CPM directories and found that the PluginManagerUser did not have all the required permissions on the:

    [Drive]:\Program Files (x86)\CyberArk\PasswordManager\Logs

    directory.

    I also found missing permissions associated with:

    [Drive]:\Program Files (x86)\CyberArk\PasswordManager\Scanner

    This was consistent with what I had observed.

    The plugin worked when I forced it to execute with higher privileges, but failed under its normal security context.

    After correcting the required permissions for PluginManagerUser, I removed the need to rely on the high-privilege test and executed the password management operation again.

    This time:

    CPM
    |
    v
    TPC Plugin
    |
    v
    PowerShell
    |
    v
    One Identity API
    |
    v
    Password successfully managed

    The CPM was able to manage the One Identity password successfully again.


    Hardened CPMs Make the Execution Context Even More Important

    This becomes especially relevant on hardened CPM servers.

    IDIRA/CyberArk has specific guidance around the PluginManagerUser profile and permissions when using the Web Application Framework on a hardened CPM.

    That is an important reminder that hardening is not simply about restricting access.

    The required execution accounts still need access to the specific resources that allow CPM components and plugins to function correctly.

    A useful way of thinking about it is:

    Too many permissions
    |
    v
    Security problem
    Correct permissions
    |
    v
    Plugin works securely
    Too few permissions
    |
    v
    Plugin failure

    The goal isn’t to give PluginManagerUser broad administrative permissions.

    The goal is to make sure that the account has the specific permissions required by the CPM architecture and the plugin execution process.

    That is why the high-privilege test was useful: it demonstrated that permissions were likely involved without making elevated execution the permanent solution.


    Why This Incident Was Misleading

    What made this troubleshooting particularly interesting was that I actually encountered two separate problems.

    The first was:

    At line:1 char:143

    which led me to a special-character issue in the command used to launch PowerShell.

    After resolving that, the original problem remained.

    Then I noticed the unexpected:

    1

    file.

    Finally, the high-privilege test gave me the key clue:

    Normal plugin execution
    |
    X
    FAILURE
    RunPluginWithHighPrivilege=Yes
    |
    v
    SUCCESS

    That led me to investigate PluginManagerUser, where I eventually found the missing permissions.

    My complete troubleshooting path therefore looked something like this:

    Password change fails
    |
    v
    "At line:1 char:143"
    |
    v
    Inspect generated PowerShell command
    |
    v
    Find special-character problem
    |
    v
    Fix PowerShell invocation
    |
    v
    Original failure remains
    |
    v
    Notice unexpected file "1"
    |
    v
    Test RunPluginWithHighPrivilege=Yes
    |
    v
    Plugin works!
    |
    v
    Suspect execution context/permissions
    |
    v
    Investigate PluginManagerUser
    |
    v
    Find missing permissions on Logs / Scanner
    |
    v
    Correct permissions
    |
    v
    Run plugin normally
    |
    v
    SUCCESS

    This is a good reminder that fixing one error doesn’t necessarily mean you have found the original root cause.

    Sometimes you remove one layer of the problem only to expose the next one.


    What I Would Check Next Time

    If I encountered a similar TPC plugin problem again, I would keep a few things in mind.

    1. Look at the exact PowerShell command

    If the trace reports:

    At line:1 char:143

    don’t immediately assume it means line 143 of the .ps1 file.

    Look at the command being passed to PowerShell.exe.

    The error may be occurring while PowerShell is parsing the command that is supposed to launch your script.


    2. Be Careful With Passwords as Command-Line Arguments

    Passwords are unpredictable input.

    A plugin may work perfectly with:

    Password123

    and fail when the next generated password contains a character that interacts badly with the way the command line is constructed.

    A custom CPM plugin should be designed with the complete password policy in mind.


    3. Compare Normal and Elevated Execution

    If appropriate in your troubleshooting environment, comparing normal plugin execution with an elevated execution can provide a valuable diagnostic clue.

    In my case:

    RunPluginWithHighPrivilege=Yes

    wasn’t the final solution.

    It was the test that pointed me toward the solution.


    4. Understand the PluginManagerUser

    When troubleshooting modern CPM plugins, don’t forget about the Windows account under which plugin operations are being performed.

    Check:

    • folder permissions;
    • user profile requirements;
    • hardening;
    • GPOs;
    • local security policies;
    • access to CPM directories;
    • and anything else the plugin needs to read, write, or execute.

    5. Pay Attention After CPM Hardening or Upgrades

    If a plugin worked previously and starts failing after:

    • a CPM upgrade;
    • hardening changes;
    • security baseline changes;
    • GPO deployment;
    • filesystem ACL modifications;

    then permissions should be high on the troubleshooting list.

    This is particularly important with PluginManagerUser, because a script may continue to work perfectly when tested manually by an administrator while failing when executed through the CPM.


    Final Thoughts

    The most useful lesson from this incident wasn’t specifically about One Identity, PowerShell, or even TPC plugins.

    It was about execution context.

    When developing or troubleshooting a CPM plugin, we naturally focus on:

    Process.ini
    +
    Prompts.ini
    +
    PowerShell
    +
    API

    But underneath all of them there is another layer:

    Windows security context
    +
    Filesystem permissions
    +
    CPM hardening

    If that layer isn’t correct, a perfectly valid plugin can still fail.

    In my case, the troubleshooting became much clearer when I temporarily tested:

    RunPluginWithHighPrivilege=Yes

    and the plugin suddenly worked.

    That told me to stop asking:

    “What’s wrong with my PowerShell?”

    and start asking:

    “What can this execution context access that the normal plugin execution context cannot?”

    That question eventually led me to the missing PluginManagerUser permissions on the Logs and Scanner directories.

    After correcting those permissions, the CPM was able to manage the One Identity passwords normally again without relying on the high-privilege workaround.

    So if you ever find yourself thinking:

    “The PowerShell works manually. Why doesn’t it work when CPM runs it?”

    don’t just look at the script.

    Look at who is running it — and what that user is allowed to access.


    References

    IDIRA/CyberArk Community — What are the differences between the PasswordManagerUser and PluginManagerUser?

    Useful background for understanding the different Windows accounts associated with CPM operations and the role of PluginManagerUser.

    IDIRA/CyberArk Community — CPM WebApplication Framework requires PluginManagerUser profile created for hardened CPM

    Useful reference when investigating PluginManagerUser, CPM hardening, user-profile requirements, and the permissions required for plugin execution on a hardened CPM.

  • Understanding IDIRA (CyberArk) TPC Plugins: Process.ini, Prompts.ini, PowerShell, and the State Machine

    When I first started looking at IDIRA (CyberArk) Terminal Plugin Controller (TPC) plugins, I found the concept a little confusing.

    There was a Process.ini, a Prompts.ini, transitions, states, conditions, FAIL(), PowerShell output… and somehow all of these pieces were supposed to work together to perform a password change.

    Once I understood one key concept, however, everything started to make much more sense:

    A TPC plugin is essentially a state machine.

    In this article, I want to explain how I understand TPC plugins now, using a practical scenario: an IDIRA (CyberArk) CPM plugin that launches a PowerShell script to change a user’s password through a REST API.

    The goal is not to build the complete plugin here. Instead, I want to focus on the architecture and, especially, on how these components interact:

    • Process.ini
    • Prompts.ini
    • PowerShell
    • stdout
    • API responses
    • TPC transitions
    • END
    • FAIL()
    • CPM error codes

    The Scenario

    Imagine that we need to manage accounts stored in an application that exposes a REST API.

    Our architecture looks roughly like this:

    CyberArk CPM
    |
    v
    CyberArk TPC
    |
    v
    PowerShell
    |
    v
    REST API

    The PowerShell script performs the actual REST API operations.

    TPC, on the other hand, controls the execution of that script.

    This distinction is important.

    I like to think about the responsibilities this way:

    Process.ini
    "What should I do?"
    Prompts.ini
    "What did I receive?"
    PowerShell
    "Do the actual work."

    Once I started thinking about TPC this way, the relationship between the files became much easier to understand.


    First: What Is a State Machine?

    Before discussing the files, we need to understand the basic idea of a state machine.

    The name sounds more complicated than the concept actually is.

    A state machine basically says:

    “I am currently at this step. If something happens, move to another step.”

    Think about a washing machine:

    OFF
    |
    v
    FILLING WATER
    |
    v
    WASHING
    |
    v
    RINSING
    |
    v
    SPINNING
    |
    v
    FINISHED

    Each step is a state.

    The movement from one state to another is a transition.

    For example:

    Current state:
    WASHING
    Condition:
    Washing time finished
    Next state:
    RINSING

    TPC follows a very similar concept.

    A simplified password-change workflow could look like this:

    Start PowerShell
    |
    v
    Get Current Password
    |
    v
    Get New Password
    |
    v
    Call API
    |
    +----------+
    | |
    Success Error
    | |
    v v
    END FAIL

    This is our state machine.


    The Role of Process.ini

    The Process.ini file defines the workflow of the plugin.

    Two particularly important sections are:

    [states]

    and:

    [transitions]

    A state represents something TPC can execute.

    For example:

    [states]
    StartScript=(spawn)PowerShell.exe -File OneIdentity.ps1
    SendCurrentPassword=<pmpass>
    SendNewPassword=<pmnewpass>
    END=

    The first state starts PowerShell.

    The next states can send information to the running process.

    Eventually, the plugin reaches either a successful state such as END or an error state.


    Starting PowerShell from TPC

    One of the things I initially wanted to understand was:

    Who actually starts the PowerShell script?

    The answer is the Process.ini.

    For example:

    StartScript=(spawn)PowerShell.exe -File OneIdentity.ps1

    The (spawn) built-in action tells TPC to launch the process.

    The architecture therefore becomes:

    CPM
    |
    v
    TPC
    |
    | Process.ini
    |
    | (spawn)
    v
    PowerShell.exe
    |
    v
    OneIdentity.ps1

    This also means that Prompts.ini does not launch PowerShell.

    That file has a completely different job.


    The Role of Prompts.ini

    If Process.ini tells TPC what to do, Prompts.ini helps TPC understand what it received.

    Suppose our PowerShell script writes:

    Write-Output "CA_REQUEST_CURRENT_PASSWORD"

    TPC receives this through the PowerShell output.

    We can define a condition in Prompts.ini:

    [conditions]
    GetCurrentPassword=CA_REQUEST_CURRENT_PASSWORD

    We have effectively told TPC:

    “If you see CA_REQUEST_CURRENT_PASSWORD, consider the condition GetCurrentPassword to have occurred.”

    That condition can now be used by the state machine.


    Understanding TPC Transitions

    This was probably the part that made everything click for me.

    Inside Process.ini, we can have:

    [transitions]
    StartScript,GetCurrentPassword,SendCurrentPassword

    The format is:

    CurrentState,Condition,NextState

    In our example:

    StartScript,GetCurrentPassword,SendCurrentPassword
    | | |
    | | |
    Process.ini Prompts.ini Process.ini

    We can read this almost like an English sentence:

    “While I am in StartScript, if I receive the GetCurrentPassword condition, move to SendCurrentPassword.”

    That is the state machine in action.


    How PowerShell and TPC Communicate

    This is where TPC becomes particularly interesting.

    The PowerShell script and TPC can effectively have a conversation.

    PowerShell can write something to stdout:

    Write-Output "CA_REQUEST_CURRENT_PASSWORD"

    TPC receives it.

    Prompts.ini recognizes it:

    GetCurrentPassword=CA_REQUEST_CURRENT_PASSWORD

    The transition then tells TPC what to do:

    StartScript,GetCurrentPassword,SendCurrentPassword

    And the next state might be:

    SendCurrentPassword=<pmpass>

    The communication looks like this:

    PowerShell
    |
    | stdout
    |
    | CA_REQUEST_CURRENT_PASSWORD
    v
    TPC
    |
    | Prompts.ini matches it
    v
    GetCurrentPassword
    |
    | transition
    v
    SendCurrentPassword
    |
    | <pmpass>
    v
    PowerShell

    PowerShell can read the value using standard input, for example:

    $currentPassword = [Console]::ReadLine()

    The same concept can be used for the new password.


    Why Not Pass Passwords on the PowerShell Command Line?

    It might be tempting to do something like:

    PowerShell.exe script.ps1 username CurrentPassword NewPassword

    But that is not a good design for credentials.

    Instead, TPC can start the PowerShell process and then provide sensitive information through the interaction with the running process.

    For example:

    TPC starts PowerShell
    |
    v
    PowerShell asks for current password
    |
    v
    TPC sends <pmpass>
    |
    v
    PowerShell asks for new password
    |
    v
    TPC sends <pmnewpass>

    The PowerShell script doesn’t need to retrieve those passwords directly from the Vault.

    TPC already has access to the relevant CPM variables.


    Calling the REST API

    Once PowerShell has the information it needs, it can perform the real operation.

    Conceptually:

    try {
    Write-Output "DEBUG: Calling password change API"
    $response = Invoke-RestMethod `
    -Uri $ApiUrl `
    -Method POST `
    -Body $Body
    Write-Output "CA_API_SUCCESS"
    }
    catch {
    Write-Output "CA_API_ERROR"
    }

    But we can make this much better.

    Instead of simply returning a generic error, PowerShell can interpret the API response and translate it into something meaningful to TPC.


    Using Control Messages

    I found it useful to think of PowerShell output as having two categories.

    The first category is control messages.

    For example:

    CA_API_SUCCESS
    CA_AUTHENTICATION_FAILED
    CA_USER_NOT_FOUND
    CA_PASSWORD_POLICY_REJECTED
    CA_SERVER_ERROR
    CA_UNEXPECTED_ERROR

    These messages are designed specifically for TPC.

    They can be mapped in Prompts.ini:

    [conditions]
    Success=CA_API_SUCCESS
    AuthenticationFailed=CA_AUTHENTICATION_FAILED
    UserNotFound=CA_USER_NOT_FOUND
    PasswordPolicyRejected=CA_PASSWORD_POLICY_REJECTED
    ServerError=CA_SERVER_ERROR
    UnexpectedError=CA_UNEXPECTED_ERROR

    The state machine can then react appropriately.


    Don’t Make TPC Understand the Entire API

    One design decision I particularly like is keeping API-specific complexity inside PowerShell.

    Imagine the API returns:

    HTTP 400

    with a JSON response indicating:

    Password does not meet complexity requirements.

    Instead of making Prompts.ini understand the entire JSON response, PowerShell can translate it:

    HTTP 400
    +
    API response
    +
    PowerShell interpretation
    |
    v
    CA_PASSWORD_POLICY_REJECTED

    TPC only needs to understand:

    CA_PASSWORD_POLICY_REJECTED

    This gives us a nice separation:

    REST API
    |
    | complicated HTTP/JSON response
    v
    PowerShell
    |
    | interprets the response
    v
    Simple CONTROL message
    |
    v
    Prompts.ini
    |
    v
    Process.ini

    PowerShell becomes the translation layer between the external API and TPC.


    Not Every PowerShell Output Needs to Be in Prompts.ini

    This was another important realization for me.

    PowerShell can generate output that is useful for troubleshooting without using that output to control the state machine.

    For example:

    Write-Output "DEBUG: Starting password change"
    Write-Output "DEBUG: Target user = $Username"
    Write-Output "DEBUG: Calling REST API"
    Write-Output "DEBUG: HTTP Status = $StatusCode"
    Write-Output "DEBUG: API returned an error"
    Write-Output "CA_USER_NOT_FOUND"

    Only:

    CA_USER_NOT_FOUND

    needs to be defined in Prompts.ini.

    The other messages exist for troubleshooting.

    Conceptually:

    PowerShell stdout
    |
    +--- DEBUG: Calling REST API
    | |
    | +--> useful for humans
    |
    +--- DEBUG: HTTP Status = 404
    | |
    | +--> useful for humans
    |
    +--- CA_USER_NOT_FOUND
    |
    +--> Prompts.ini
    |
    v
    State machine

    This gives us much better visibility when investigating a plugin failure.


    Debug Messages vs Control Messages

    I therefore like to keep a clear distinction.

    Diagnostic messages:

    DEBUG: Authentication request started
    DEBUG: Authentication successful
    DEBUG: Password change request started
    DEBUG: HTTP status = 400
    DEBUG: API error message = Password policy violation

    Control messages:

    CA_API_SUCCESS
    CA_AUTHENTICATION_FAILED
    CA_USER_NOT_FOUND
    CA_PASSWORD_POLICY_REJECTED
    CA_SERVER_ERROR
    CA_UNEXPECTED_ERROR

    Diagnostic messages are primarily for humans.

    Control messages are primarily for the TPC state machine.

    That distinction makes the plugin much easier to troubleshoot and maintain.


    Be Very Careful With Debug Output

    There is an important security consideration here.

    If PowerShell output can end up in TPC/CPM traces, we should never do this:

    Write-Output "Current password = $CurrentPassword"
    Write-Output "New password = $NewPassword"
    Write-Output "Bearer token = $Token"

    The same applies to blindly logging complete REST request bodies:

    Write-Output ($Body | ConvertTo-Json)

    If the body contains the new password, we have just written a credential into a log file.

    Instead, log the operation:

    Write-Output "DEBUG: Current password received from TPC"
    Write-Output "DEBUG: New password received from TPC"
    Write-Output "DEBUG: Authentication token obtained"
    Write-Output "DEBUG: Password change request submitted"
    Write-Output "DEBUG: HTTP Status = $StatusCode"

    Log what happened, not the secrets used to make it happen.


    What Does FAIL() Do?

    Another important part of Process.ini is the FAIL() built-in action.

    For example:

    UserNotFound=FAIL(One Identity user was not found,8102)

    When the state machine reaches UserNotFound, TPC terminates the plugin execution as a failure.

    We can think about the syntax as:

    FAIL(ErrorMessage,ErrorCode)

    For example:

    One Identity user was not found

    is the human-readable error, while:

    8102

    is the plugin return code.

    A transition could look like:

    CallAPI,UserNotFoundCondition,UserNotFound

    The complete flow becomes:

    PowerShell
    |
    | CA_USER_NOT_FOUND
    v
    Prompts.ini
    |
    | UserNotFoundCondition
    v
    Process.ini transition
    |
    v
    UserNotFound
    |
    v
    FAIL(One Identity user was not found,8102)
    |
    v
    TPC terminates with failure
    |
    v
    CPM

    END vs FAIL()

    This also makes the difference between END and FAIL() easy to understand.

    Successful path:

    API
    |
    | success
    v
    PowerShell
    |
    | CA_API_SUCCESS
    v
    Prompts.ini
    |
    | Success
    v
    Process.ini
    |
    v
    END
    |
    v
    SUCCESS

    Failure path:

    API
    |
    | user doesn't exist
    v
    PowerShell
    |
    | CA_USER_NOT_FOUND
    v
    Prompts.ini
    |
    | UserNotFound
    v
    Process.ini
    |
    v
    FAIL(...,8102)
    |
    v
    FAILURE

    In other words, most paths through our state machine will eventually lead to either:

    END

    or:

    FAIL()

    Designing Good Plugin Error Codes

    I also wouldn’t simply make the plugin error code equal to the HTTP status.

    For example:

    HTTP 401 → plugin error 401
    HTTP 404 → plugin error 404

    The HTTP status describes what happened at the REST protocol/API level.

    The plugin return code should describe the problem from the CPM/plugin perspective.

    For example, we might define:

    8101 - Authentication failed
    8102 - Target user not found
    8110 - Authorization denied
    8141 - Password rejected by policy
    8142 - Password change not permitted
    8161 - API timeout
    8162 - Connection failure
    8163 - TLS/certificate problem
    8164 - API server error
    8181 - Invalid API response
    8199 - Unexpected error

    The exact range should be chosen carefully for your environment and checked against CyberArk’s documented/reserved codes, but the important idea is to create a consistent error catalog instead of choosing random numbers.

    The architecture then becomes:

    HTTP/API response
    |
    v
    PowerShell determines the meaning
    |
    v
    CONTROL MESSAGE
    |
    v
    Prompts.ini condition
    |
    v
    Process.ini transition
    |
    v
    Plugin error code

    For example:

    HTTP 400
    +
    "Password does not meet policy"
    |
    v
    CA_PASSWORD_POLICY_REJECTED
    |
    v
    PasswordPolicyRejected
    |
    v
    FAIL(New password rejected by password policy,8141)

    This is much more useful than simply reporting:

    HTTP 400

    to whoever is troubleshooting the CPM.


    Putting Everything Together

    Let’s look at the complete architecture one more time.

                         CyberArk CPM

    |

    v

    CyberArk TPC

    |

    Process.ini

    |

    spawn

    |

    v

    PowerShell

    |

    "CA_REQUEST_PASSWORD"

    |

    stdout

    |

    v

    Prompts.ini

    |

    condition matched

    |

    v

    Process.ini transition

    |

    Send <pmpass>
    >
    |

    stdin

    |

    v

    PowerShell

    |

    v

    REST API

    |

    HTTP + JSON

    |

    v

    PowerShell

    |

    interprets result

    |

    +-------------+-------------+

    | |

    CA_API_SUCCESS CA_USER_NOT_FOUND

    | |

    v v

    Prompts.ini Prompts.ini

    | |

    v v

    Process.ini Process.ini

    | |

    v v

    END FAIL(...,8102)

    | |

    v v

    SUCCESS FAILURE

    Once I understood this flow, TPC stopped looking like a collection of unrelated INI files and started looking like a relatively simple orchestration engine.


    The Mental Model I Use

    If I had to summarize everything in a few lines, this is what I would remember:

    Process.ini
    = What should I DO?
    Prompts.ini
    = What did I RECEIVE?
    PowerShell
    = Do the real work.
    stdout
    = PowerShell talks to TPC.
    stdin
    = TPC talks to PowerShell.
    Conditions
    = Give meaning to received output.
    Transitions
    = Decide where the state machine goes next.
    END
    = Finish successfully.
    FAIL()
    = Finish with an error.

    And perhaps the most useful sentence of all:

    “I am in this state. If I receive this condition, move to that state.”

    That simple sentence explains a surprisingly large part of how a CyberArk TPC plugin works.


    Final Thoughts

    TPC plugins initially looked more complicated to me than they actually were.

    The breakthrough was understanding that Process.ini, Prompts.ini, and PowerShell are not competing with each other. They have different responsibilities.

    Process.ini orchestrates the workflow.

    Prompts.ini recognizes conditions.

    PowerShell handles the application-specific logic — in this case, communicating with a REST API.

    Once those responsibilities are clearly separated, it becomes much easier to design the plugin, troubleshoot failures, and add meaningful logging without turning the state machine into a collection of API-specific details.

    In a future article, I may take this architecture one step further and build a practical TPC plugin example from beginning to end, including the Process.ini, Prompts.ini, PowerShell script, API error handling, and troubleshooting through TPC traces.

    Official Reference

    CyberArk documentation:

    Terminal Plugin Controller (TPC)
    CyberArk — Terminal Plugin Controller

  • Why Shouldn’t the Idira (CyberArk) Digital Vault Be on the Same Network as Everything Else?


    If you’ve worked with Idira (formerly CyberArk) for a while, you’ve probably heard this recommendation before:

    “The Digital Vault should not be joined to the domain and should be isolated from the corporate network.”

    Most people simply accept that recommendation because “it’s in the documentation.”

    But sooner or later, almost every customer asks the same question:

    “Why?”

    Honestly, it’s a fair question.

    At first glance, it doesn’t seem to make much sense. After all, every other server in the environment lives happily inside the corporate network. Why should the Vault be treated differently?

    The answer becomes much simpler if we stop thinking of the Vault as just another server.

    It’s not really a server…

    Imagine you own a bank.

    Inside the building, you have computers, printers, employee desks, meeting rooms, and ATMs.

    Now think about where the money is kept.

    It isn’t sitting next to someone’s desk.

    It’s locked inside a heavily protected vault, separated from everything else.

    The reason is obvious.

    If someone manages to enter the building, you don’t want them to immediately reach the place that contains the most valuable assets.

    The Digital Vault follows exactly the same idea.

    It stores the credentials that protect your entire organization.

    Administrator passwords.

    Service accounts.

    Application secrets.

    Certificates.

    Encryption keys.

    Audit information.

    In many environments, if someone gains full control of the Vault, they can potentially gain access to almost everything else.

    That’s why it deserves a different level of protection.


    What happens if everything lives together?

    Imagine a company where the following servers all share the same network:

    • Active Directory
    • SQL Server
    • File Server
    • Web Servers
    • PVWA
    • CPM
    • PSM
    • Digital Vault

    Everything looks organized.

    Everything communicates easily.

    Everything is simple.

    Now imagine a web server gets compromised because someone forgot to install a security update.

    It happens every day.

    The attacker now has a foothold inside your network.

    From there, they begin exploring.

    They scan the network.

    They identify other servers.

    They try connecting to different services.

    They attempt lateral movement.

    Eventually, they discover the Digital Vault.

    Now, to be clear, discovering the Vault doesn’t mean they’ve compromised it.

    The Vault was specifically designed to resist attacks.

    But here’s the important point:

    Why make it easier for an attacker to even find it?

    Security isn’t only about building strong walls.

    It’s also about making those walls harder to reach.


    Security is about reducing opportunities

    One lesson I’ve learned working with PAM solutions is that good security isn’t only about blocking attacks.

    It’s about reducing the number of opportunities attackers have.

    Think about your own house.

    You probably lock your front door.

    But you probably also close your windows when you leave.

    Not because you expect someone to break in every day…

    …but because removing opportunities is always a good idea.

    The Digital Vault follows exactly the same philosophy.

    Instead of allowing every server in the company to potentially communicate with it, only a very small number of systems should ever know it exists.

    Less visibility.

    Less exposure.

    Less risk.


    Why doesn’t the Vault join the Active Directory domain?

    This is another recommendation that often surprises customers.

    “We already trust Active Directory.”

    “So why shouldn’t the Vault trust it too?”

    The answer is actually pretty interesting.

    The Vault is designed under the assumption that one day your corporate infrastructure could be compromised.

    Notice I didn’t say will.

    I said could.

    Because that’s exactly how security architects think.

    If an attacker gains Domain Admin privileges, they can usually control almost every Windows server in the environment.

    Group Policies.

    Authentication.

    Administrative access.

    DNS.

    Certificates.

    All of these become potential attack paths.

    By keeping the Vault outside the domain, you’re creating one more security boundary.

    Even if the domain is compromised, the Vault isn’t automatically affected.

    It’s one less dependency.

    And in security, fewer dependencies usually mean fewer problems.


    Why avoid DNS?

    I’ll admit this one confused me the first time I read the recommendation.

    Running a server without DNS feels almost wrong.

    But then it starts making sense.

    DNS is another service your infrastructure depends on.

    If DNS is unavailable, servers may struggle to find each other.

    If DNS is compromised, traffic could potentially be redirected somewhere it shouldn’t go.

    The Digital Vault doesn’t really need dynamic name resolution.

    Its communication is very controlled and very predictable.

    Using static IP addresses and a carefully managed hosts file removes yet another dependency from the equation.

    Again…

    The goal isn’t convenience.

    The goal is resilience.


    Assume the network is already compromised

    One of the biggest mindset shifts in cybersecurity is this:

    Don’t build your defenses assuming nothing will ever go wrong.

    Build them assuming something eventually will.

    That’s the philosophy behind many modern security frameworks, including Zero Trust.

    The Digital Vault follows that same mindset.

    If someone compromises a workstation…

    the Vault should still be protected.

    If someone compromises Active Directory…

    the Vault should still be protected.

    If someone compromises DNS…

    the Vault should still be protected.

    It’s not about distrust.

    It’s about planning for bad days.


    The Vault isn’t isolated because it’s fragile.

    It’s isolated because it’s valuable.

    That’s a very important distinction.

    Sometimes people assume isolation exists because the Vault can’t handle attacks.

    Actually, it’s almost the opposite.

    The Vault is one of the most hardened components in the entire PAM solution.

    The isolation exists because it protects the most valuable secrets in your organization.

    And when something is that valuable, giving it an extra layer of protection simply makes sense.

    Just like we don’t keep cash in the reception area of a bank…

    we shouldn’t treat the Digital Vault like an ordinary server.


    Final thoughts

    One thing I really like about the Idira (CyberArk) architecture is that many of its recommendations stop making sense if you only look at them individually.

    Don’t join the domain.

    Avoid DNS.

    Isolate the Vault.

    Restrict network access.

    At first, they can seem overly cautious.

    But once you step back and think about what the Digital Vault actually represents, the picture becomes much clearer.

    It isn’t just another server.

    It’s the place where the keys to your entire infrastructure are stored.

    And if there’s one lesson security has taught us over the years, it’s this:

    The strongest lock in the world doesn’t help much if you leave the vault in the middle of the lobby.


  • How I Solved an IDIRA (formerly CyberArk) Vault Cluster Communication Issue in My Virtual Lab

    Sometimes the hardest problems aren’t caused by IDIRA at all, they’re hidden in the networking underneath.

    While building my IDIRA Digital Vault Cluster 15.2 lab on Windows Server 2022, I ran into a networking issue that took me longer to understand than I expected.

    The strange part?

    Everything worked perfectly before installing the Vault.

    The Windows servers could ping each other without any issues, the network looked healthy, and I was confident the cluster installation would be straightforward.

    Then, after installing IDIRA…

    Everything changed.

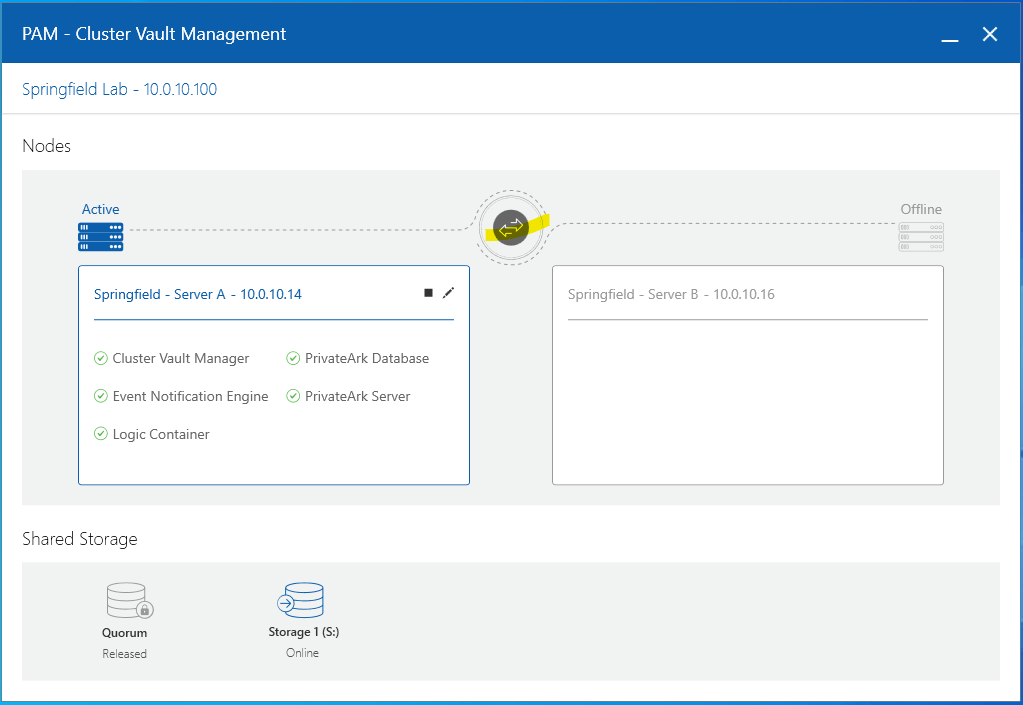
    The Cluster Vault Manager (CVM) showed the peer node as Offline, communication between the nodes stopped working correctly, and the Switchover button remained disabled.

    After a lot of troubleshooting, I finally found the real root cause. In this article, I’d like to share what happened, why it happened, and how I fixed it.


    My Lab Environment

    My environment consisted of two Vault servers with two network adapters each.

    ServerPublic NetworkPrivate Network
    Vault0110.0.10.1410.0.10.15
    Vault0210.0.10.1610.0.10.17
    VIP10.0.10.100

    The important detail is that both network adapters belonged to the same subnet (10.0.10.0/24).

    At first, I didn’t think this would be a problem.


    Symptoms

    Immediately after installing the Vault Cluster, I started seeing several strange behaviors:

    • The peer node appeared as Offline in the Cluster Vault Manager.
    • The Switchover button was disabled.
    • Some ping tests returned General failure.
    • Communication between the Vault nodes became unreliable.

    Cluster Vault Manager showing the peer node as Offline


    The Confusing Part

    This was the part that confused me the most.

    Before installing IDIRA:

    ✅ Both Windows servers communicated normally.

    After installing IDIRA:

    ❌ Communication suddenly became unstable.

    So naturally my first thought was:

    “The Vault installation broke my network.”

    But that’s not what actually happened.


    What Was Really Happening?

    The problem wasn’t IDIRA.

    The problem was how Windows was choosing the network interface.

    Since both NICs were in the same subnet, Windows had multiple valid paths to reach the peer server.

    For a regular Windows server, that’s usually acceptable.

    For an IDIRA Vault Cluster, it isn’t.

    The Cluster Vault Manager expects each network to have a very specific purpose:

    • Public Network
      • Client communication
      • Vault services
      • Virtual IP
    • Private Network
      • Heartbeat
      • Cluster synchronization
      • Internal node communication

    If Windows decides to send heartbeat traffic through the Public NIC instead of the Private NIC, the Cluster Manager considers the communication invalid.

    This is why the peer appears Offline even though the servers can technically still communicate.


    A Simple Way to Visualize the Problem

                     BEFORE ROUTES

    Windows chooses automatically

    +------------------------+
    | Vault 01 |
    | |
    Public ----| 10.0.10.14 |
    Private ---| 10.0.10.15 |
    +------------------------+
    |
    | Windows may choose
    | either interface
    |
    +------------------------+
    | Vault 02 |
    | |
    Public ----| 10.0.10.16 |
    Private ---| 10.0.10.17 |
    +------------------------+

    Result:
    ❌ CVM cannot guarantee the heartbeat uses the correct network.

    The Clue

    While researching the issue, I found an IDIRA Community article describing a very similar situation.

    Link to the article:

    https://community.cyberark.com/s/article/Status-of-the-peer-node-appears-as-Offline-within-the-CVM

    The recommendation was surprisingly simple:

    Create static host routes.

    At first I wondered:

    “Why would adding routes fix a communication problem if the servers already know how to reach each other?”

    Then it clicked.

    The routes weren’t teaching Windows where to go.

    They were teaching Windows which network adapter must always be used for each destination.


    The Fix

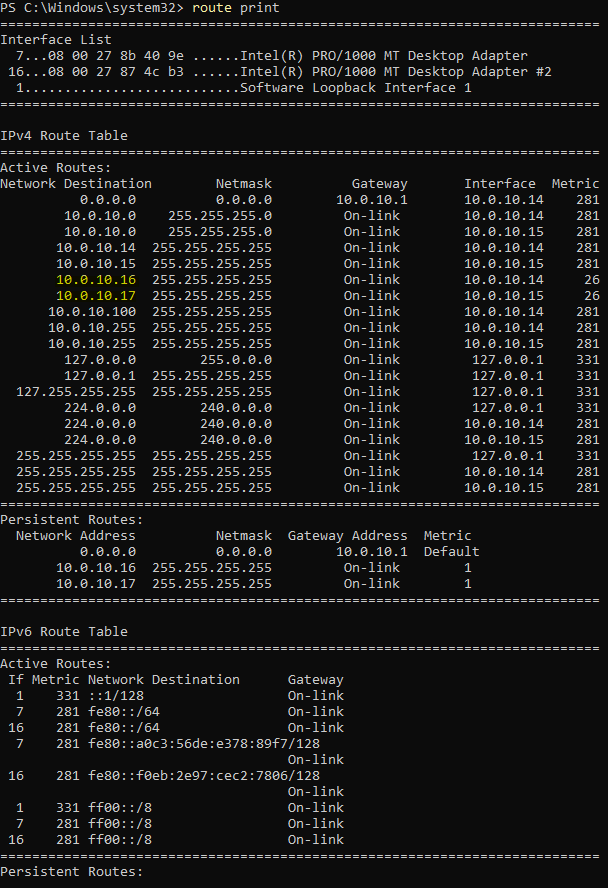
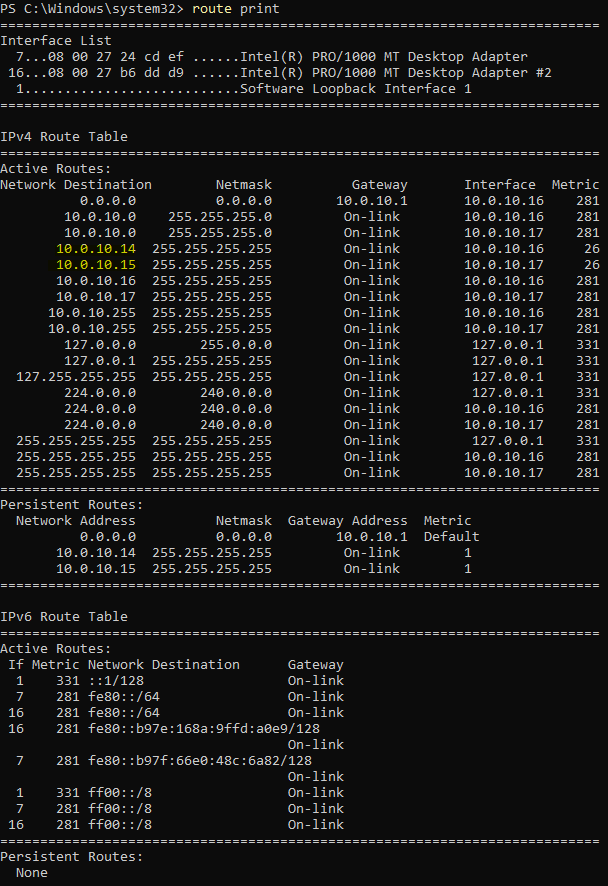
    I created persistent /32 host routes.

    The logic became:

    • Peer Public IP → Always use the Public NIC
    • Peer Private IP → Always use the Private NIC

    After creating the routes, Windows no longer had to guess.

    Communication immediately became stable.

    The Cluster Vault Manager recognized the peer correctly.

    The Offline status disappeared.

    The Switchover button became available again.

    Exactly what I wanted.


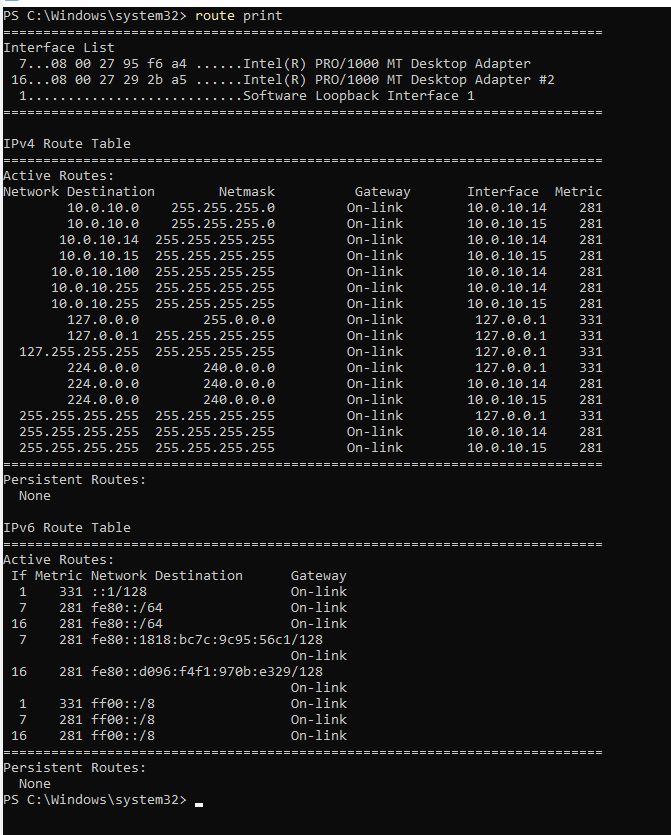
    Verifying the Routes

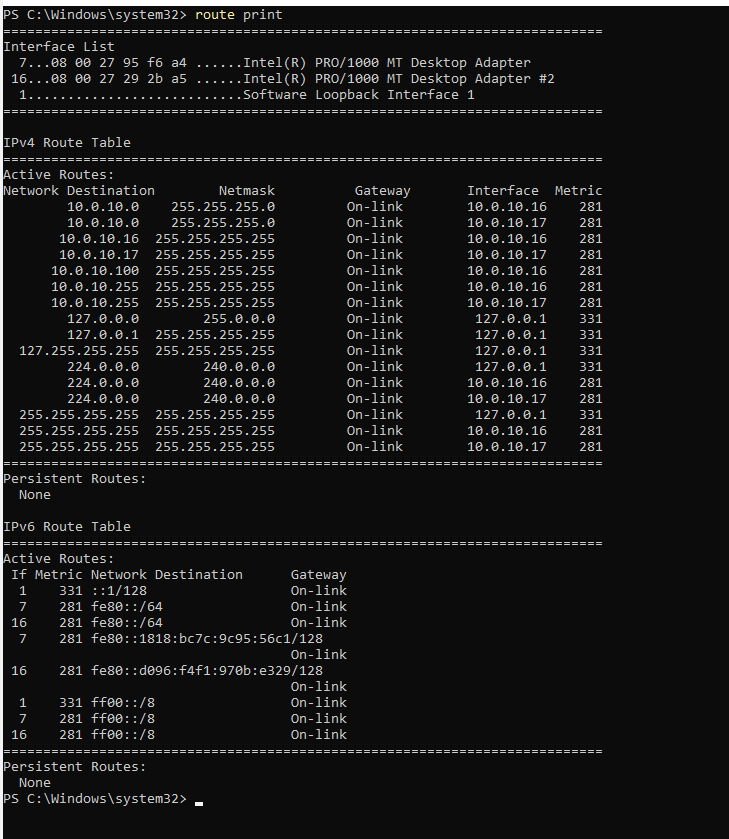
    I confirmed the routing table using:

    Get-NetRoute

    and

    route print

    Route Print before adding the static routes

    Route Print after adding the static routes


    Testing Connectivity

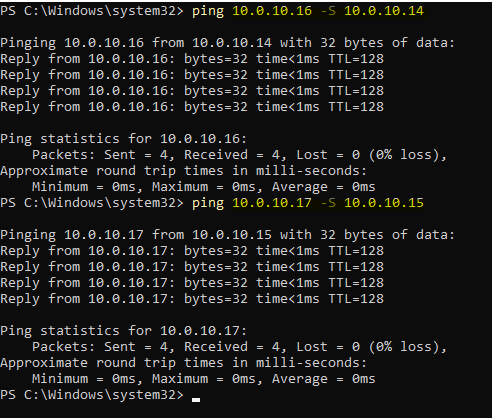
    I also forced the source IP during ping tests.

    ping 10.0.10.16 -S 10.0.10.14
    ping 10.0.10.17 -S 10.0.10.15

    This confirmed that each destination was using the expected interface.

    Successful connectivity test


    Why Did This Only Happen After Installing IDIRA?

    This was probably the biggest lesson I learned.

    IDIRA didn’t break my network.

    Instead, the installation introduced a service that depends on predictable network paths.

    Before installing the Vault, Windows could make routing decisions automatically.

    After installing the Cluster Vault Manager, those automatic decisions were no longer acceptable because heartbeat traffic must always travel through the correct interface.

    Once I understood that, the behavior made perfect sense.


    Best Practice

    If you’re designing a new environment, the best solution is still to use separate subnets.

    For example:

    • Public Network → 10.0.10.0/24
    • Private Network → 192.168.100.0/24

    In that scenario, Windows naturally selects the correct interface without requiring static routes.

    However, if your lab (or even an existing environment) uses both NICs within the same subnet, persistent host routes are an effective solution.


    Final Thoughts

    One of the things I enjoy most about building IDIRA labs is that every challenge teaches something new.

    This issue reminded me that not every IDIRA problem is actually an IDIRA problem.

    Sometimes the software is simply exposing a networking behavior that Windows has quietly tolerated all along.

    Understanding why something happens is far more valuable than simply memorizing the fix.

    Hopefully, if you ever see your peer node stuck in Offline after installing a Vault Cluster, this article will save you a few hours of troubleshooting.

    If you’ve faced similar issues in your IDIRA labs, I’d love to hear about your experience. Every environment teaches us something new, and sharing those lessons is one of the best ways we can help the community grow.